Over the last few weeks I've become completely obsessed with tatting. It's not like I need another craft to take up time that should be spent working on knitting designs (or practising the violin) but, as soon as I picked up my shuttle again, I was sucked into a compulsive world of thread and tiny knots.
In the years since I last did any tatting there's been this little invention called the Internet so I now have evidence that I'm not in fact the only tatter in existence. For a craft that's often described as 'dying' there are an awful lot of people out there doing it. There are lovely tatting blogs like Le Blog de Frivole and Lace-lovin' Librarian, a Tatta Tat Tatters group on Ravelry and lots more. I don't do facebook but I'm sure there are tatting groups there too.
Tatting developed as a craft in the 19th Century and is believed to have evolved from Knotting where a larger shuttle was used to make knotted thread that was then couched down to fabric as part of an embroidered piece. Lace was very popular at that time but was also very expensive; tatting was a relatively simple way of making your own lace. In the first half of the 20th Century tatting was mostly used to make edgings for linen, doileys and collars and patterns for these can still be found in charity shops.
In recent years the craft has developed with the availability of beautiful coloured threads, including variegated shades. The ones I've started using are Lizbeth threads; in the picture above I tatted the centre of the motif with 658, Ocean Turquoise and am working the edging with 149, Peacock Blues. I've linked to the US site Handy Hands as they have better pictures of the colours but, if you are in the UK, I can thoroughly recommend Roseground who stock all the Lizbeth threads as well as other threads, shuttles and lots of tatting books. Their service is very quick and, with my first order of threads (yes, there's been more than one), they sent me a paper Lizbeth shade chart which is really helpful. It even lists which solid colours will match each of the variegated shades which is very helpful when you can't see the actual thread.
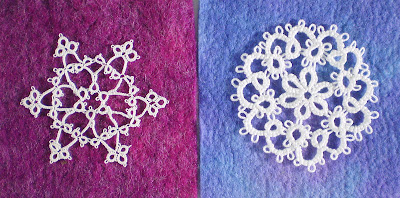
Tatting threads come in various thicknesses (or should that be thinnesses?) - the higher the number, the thinner the thread. Mostly I'm using size 20 but I did try a little snowflake in size 80, just to see what I thought.
The motif on the right was done with a thread that's about a size 10 so you can see how much finer the 80 is. Funnily enough, it wasn't much more difficult than tatting with thicker thread but I still think I prefer the look of the Lizbeth 20.
As well as the thread, you also need a shuttle or a tatting needle. I haven't tried needle tatting so I can't talk about that. I have to admit that I was very taken with the shuttles - I do love a good craft tool - so that's what I went for. The ones I use are Aerlit Shuttles which come in various pretty colours and have a tiny hook on the end which you use for joining the rings and chains together as you go. The thread is wound on to a removable bobbin and you get a spare one with each shuttle.
So, after all that, would you like to see my tatting? Of course you would, who can resist an offer like that? I started off with various motifs, mostly from the New Tatting book.
The two at the top are Marigold and Dahlia and the one with the colours is the Hydrangea Mat. The snowflake is from Jennifer Williams' book Tatted Snowflakes. This is a clever pattern because you make two shapes and then weave them together to make the finished snowflake.
Then I moved on to bookmarks as I wanted to make some things I could give as presents. This was the first one I made; it's Jon Yussof's Foldover Bookmark which is available as a free pattern on her blog Tatsaway.
You fold the bookmark over the page where the two sections meet. This one was for my daughter. The next two were also from free patterns.
The one with the ribbon is Bookmark with Two Layers, another clever pattern by Jennifer Williams and the flower one is Rachael Mohler's Flower Bookmark.
I've just ordered another new tatting book (told you I was obsessed) but, while waiting for that to arrive, I've tatted a square motif from New Tatting and learnt how to do split rings from the same book. It has photo tutorials for the different techniques which are very clear. The blue motif at the top of this post is what I started last night (after telling myself I wouldn't start another tatting project). It's another free pattern from Jennifer Williams; this one is just called Motif for a Coaster.
Have I persuaded any of you to have a go at tatting? It's much easier than it looks and the results are really impressive. You can find out more about it at the Ring of Tatters - that's where I got the information about the history of tatting. In fact I'm off now to join them.


THANK YOU SO MUCH! I'm a fan, love every thing you post and knit and do (that I know of).
ReplyDeleteKeep on the good work.
Thank-you, it's so nice of you to comment. It can be a bit lonely wittering on to myself!
ReplyDelete