Thursday 25 October 2018

Lovely Little Looms


I have been more that a little obsessed with my collection of pin looms lately. There's something very compelling about being able to weave small pieces so quickly. I started off with my Hazel Rose Multi Looms - that's the two square looms at the top of the picture. These looms have the pins placed in groups of three so that you can weave squares like those worked on old Weave-It Looms which were very popular during the twentieth century in the United States.

With this type of weaving you create the warp by wrapping the yarn round the pins in three directions and then use a long needle to weave across. The finished squares have a dimpled edge.

Squares woven on the 4" and 2" multi loom

That bigger square is one of a pile that I'm weaving with James C Brett's Marble Chunky yarn. I find this is the thickest yarn that I can use on these looms. I'm using two shades and plan to sew them together into a blanket eventually.


As for the tiny 2" loom, that's been useful in planning colours for a new weaving project I'm planning - more of that later.


These looms are called multi-looms because you can weave on them in various ways, including diagonally. I've just bought a set of Hazel Rose's looms specially designed for this bias weaving.


This is the Tiny Weaver Set, a square and a triangle loom to weave shapes that can be sewn together to make lots of exciting patterns.

With this sort of weaving, you wrap the pins and weave at the same time, using a long crochet hook to pull the yarn through.


The resulting squares have straight edges and I like the look of the diagonal weave.

Straight weaving and diagonal weave

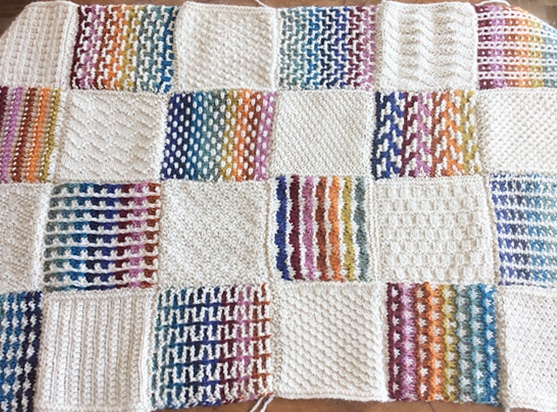
I'm using two more shades of the James Brett Chunky to weave a blanket, using just the square loom from the Tiny Weaver set. You can make all sorts of exciting patterns just with squares. Here's the design I planned after looking through my quilt books.


i'm starting in the middle and working outwards in a sort of spiral; this is what I've done so far.


Somehow, this looks more like one big piece of fabric than knitted or crocheted squares do when they're sewn together.

I haven't forgotten the little triangle loom though; that's going to play a starring part in the Temperature Blanket I'm planning to weave next year. I've been inspired by reading about weavers working on their temperature blankets this year on the Looms To Go ravelry group and I thought it would be nice to have a go too. It took me ages to draw a plan of what I want to do.


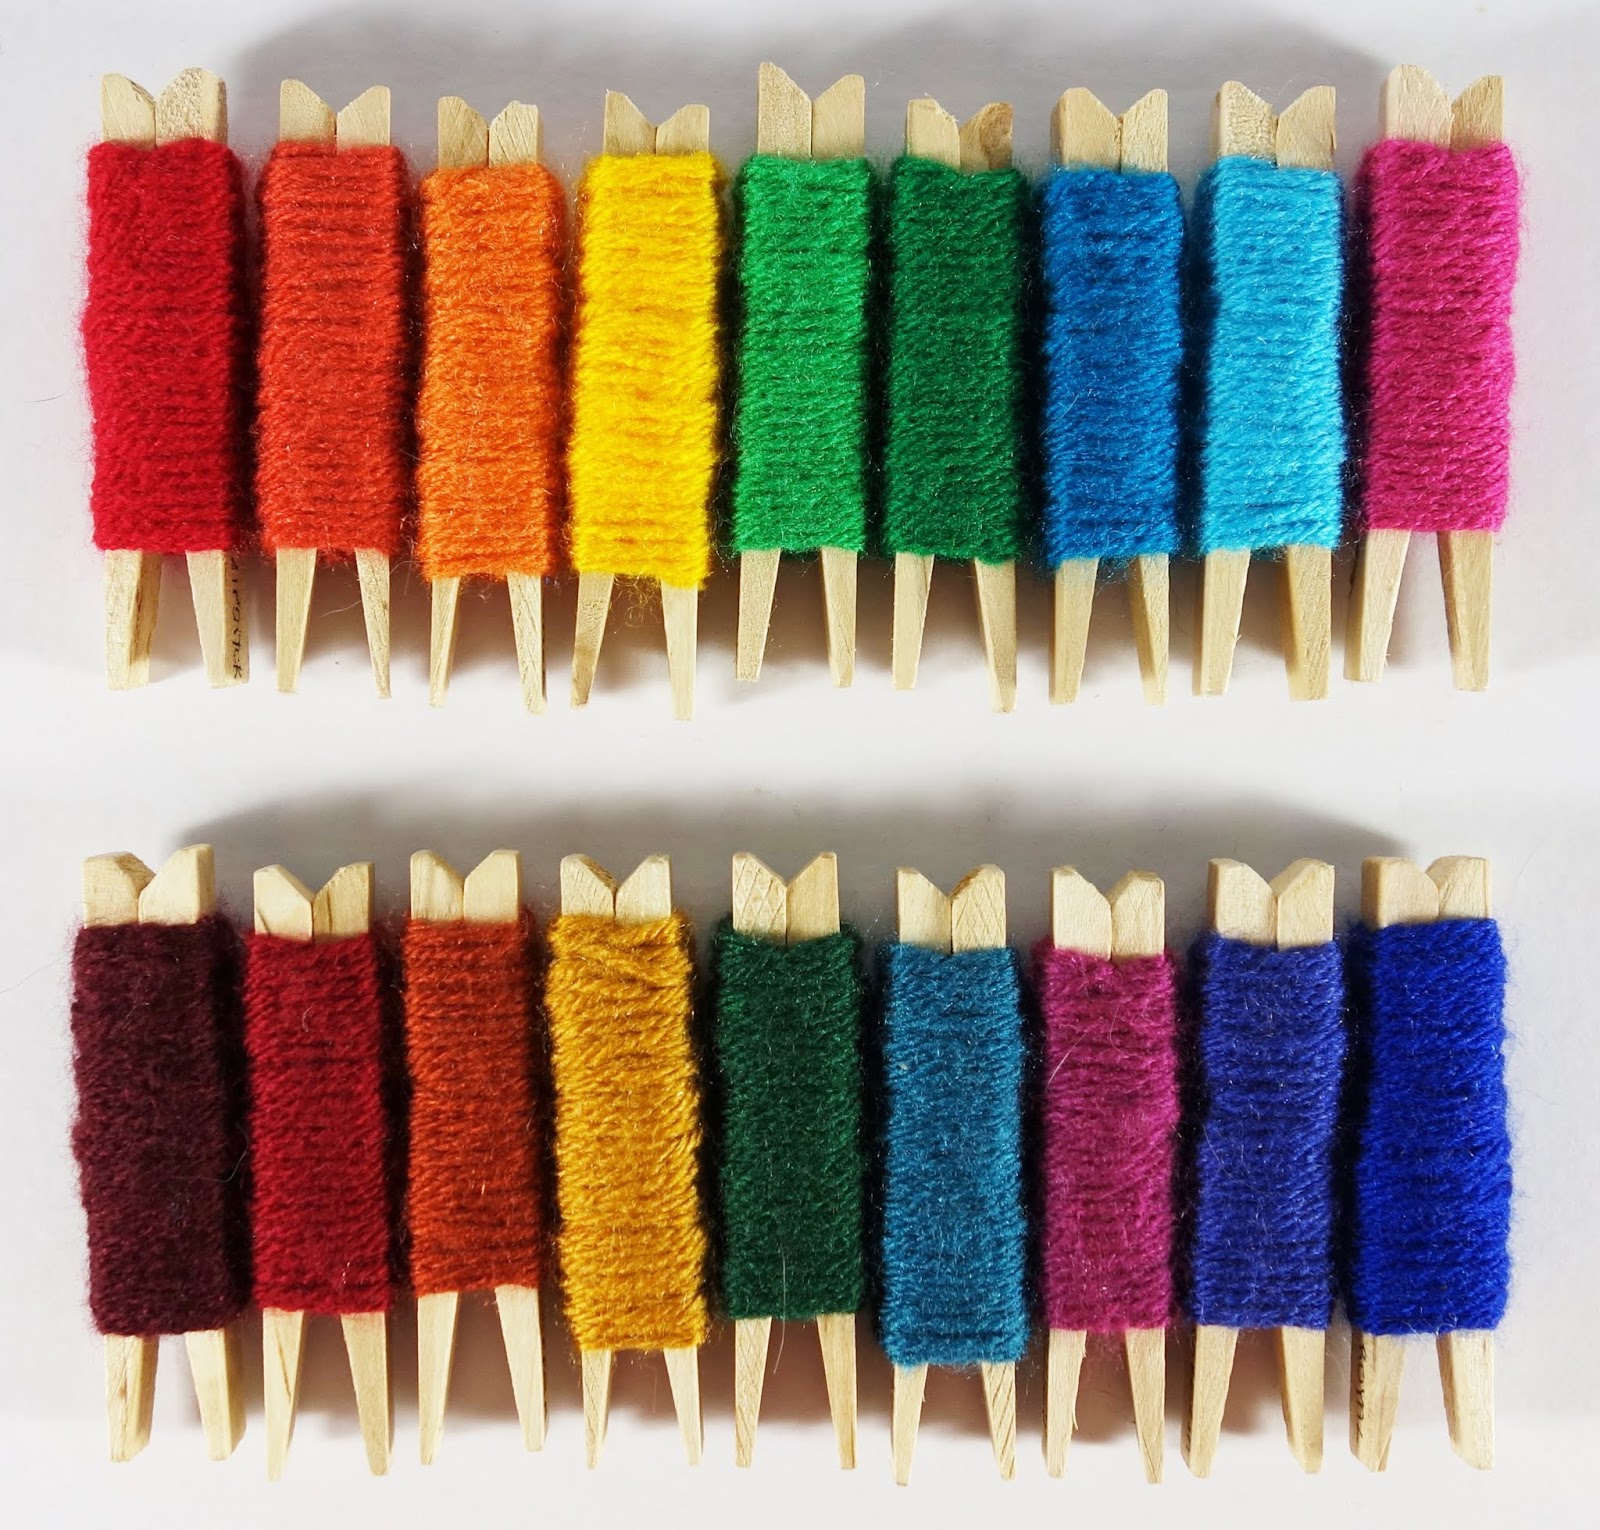
The main part is going to be made up of woven triangles, one for each day of 2019. I'll weave each triangle in a shade to match that day's temperature. I've got 19 colours ready, one for roughly every two degrees Celsius. The months will be marked by squares and then I'm going to do a key to the colours at the side. The whole thing will be bordered with grey squares. I was going to use navy blue as in this sample but it's just so hard on the eyes to work with very dark colours.


I had thought I would have to buy lots of colours in a thick yarn but then I made the happy discovery that two strands of Stylecraft Special DK are just the right weight. Here are a few sample squares ...


The two grey squares are samples of my border and month squares. All those little squares are going to be the key to the 19 colours. I've stuck labels on the back of these with the temperature range that each one represents.

I'm really looking forward to starting work on this blanket in the New Year. It will be nice to be doing something that isn't one of my own patterns, just like a normal person.

The other little loom I want to show you today is very exciting. 


This is a Turtle Loom from Blueboonet Crafters and, as you can see, you can weave hexagons on this one. These looms come in various sizes and a friend kindly sent me the new Fine Sett Turtle Loom. The pins are close together on this loom which means you can use finer yarns. This is great for me as I have a LOT of leftover thin yarn. 

The Turtle Looms combine bias and straight weaving which makes them fun to use. First you weave diagonally ...


... then you thread your yarn on to a needle and weave back and forth for the rest of the hexagon.


By the way, I love the new pencil case I found to hold my weaving tools. Not only is it a beautiful green but it's made of a very tactile silicone. I may have to go back to Office Outlet and get another one. They had a bright blue ... and a yellow ... and ...

Anyway, here are my hexagons sewn together.


I'm using Hayfield Spirit DK which is a thinnish DK and this will be a scarf. I'm adding the hexagons in rows of three (those dark ones on the right are the last row to be added).

Another very exciting thing I've discovered with this loom is that, if I use thin sockweight yarn (about 400 m per 100 g), I can sew two hexagons together to get a hexiflat. When I sew these together, I'll have different colours on each side.


These are going to be a cowl when they grow up. I'll use single hexagons at the sides and fold them in half so the finished cowl will have straight sides. Does that make sense? Here's a little mat I made using a double hexagon in the centre and then folded hexagons around it. 


I may have got just a bit carried away when it came to embroidering those little flowers.

I hope you've enjoyed looking at my loom collection. These are such fun to work with, I can really recommend them. In fact, I think I might just do a bit of weaving now ...


Friday 19 October 2018

Stacking Stars

The problem with publishing a big Christmas pattern series and a year long series like the Blankie is that, while they're a lot of work, people not knitting either of them think I'm not doing anything ... which means the donations to my Fundraising Page drop off. At times like this I try to design a quick pattern to fill the gaps while I carry on working on bigger things (it would help if I didn't keep on designing blankets, I've got three more in the pipeline at the moment).

I've just finished one such pattern, Stacking Stars and I feel the need to show it to anybody and everybody so here it is.


These are very simple, garter stitch stars which come in nine sizes and can be stacked together to make a rainbow tree. I think this is such a typical Frankie pattern in many ways.

First of all, it started with the colours. I love any excuse to play about with lots of bright colours and, since I made my Colour Pegs of Stylecraft Special DK, this has been much easier to do. For this pattern, I had in mind a range of brightly coloured stars in all different sizes so I got my colour pegs out to choose my colours. I thought nine would be enough so I put together two sets of colours, one bright and the other a bit more muted.


Then, on the grounds that you can never have too many colours, I re-arranged them into a sequence so that I could use both sets.


When I'm arranging colours like this, I very often put them in rainbow order - Richard Of York Gave Battle In Vain (that was fun; I may have to write in colour more often). I love the way Stylecraft Special is labelled by name rather than colour; my chosen colours are, from left to right:

Burgundy, Claret, Lipstick, Copper, Gold, Sunshine, Kelly Green (one of my favourites), Green, Bottle, Petrol, Empire, Turquoise, Fuchsia Pink, Boysenberry, Lobelia and Royal. I work with this yarn so often that I'm starting to learn the names off by heart; it's almost like they're my friends ... Oh dear.

Anyway, after choosing my colours I had to work out how to knit the stars. This is where I decided to go back to one of my old patterns, Advent Stars.


I designed these a couple of years ago to use up yarn left over from my Opal Advent Calendar, after knitting my Patchwork Pelerine. I understand Opal aren't producing a yarn advent calendar this year which is probably just as well for me as I still haven't finished the project I started with the 2016 calendar.

So, I took the basic pattern I'd used for the Advent Stars and then worked out how to knit different sizes. This turned out to be really easy, it was just a case of adjusting the number of pattern repeats to suit the number of stitches cast on. This is why I love garter stitch, it makes designing so easy. Right, I thought, knit nine sizes of stars, starting with 4, 5, 6, 7, 8, 9, 10, 11 and 12 stitches. That shouldn't take long.

This is where I hit another typical feature of my patterns. They might be colourful and very simple to knit but it takes a surprisingly long time to knit enough of any given pattern to be able to produce a pretty picture. Turns out it takes a very long time to knit 18 stars (plus one for the top of the tree). It didn't help that each star is actually two star shapes sewn together. This makes the shapes more regular as well as giving them a bit of body. So, many days later, I ended up with this ...


At this point I got distracted by arranging the stars into pretty patterns. This happens to me a lot when I'm working with lots of colours. There was a lot of this ...


Eventually I decided it was about time I turned turn the stars into something. I'd had the idea of a tree in mind from very early on but I couldn't decide how to arrange the stars. Should I stack them so that all the edges matched like this ...


... or offset the points to make more of a rosette shape ...


... or perhaps something more gradual, like this swirl ...


In the end I decided on the first option and set about sewing the stars together through their centres. This was very quick and easy, although I realised half way through that I needed to use the colour of the topmost star, not the bottom one as that would be the one that showed. 

And guess what I found out once I'd finished? I could still twist the stars once they were joined which meant I could have all three shapes.


I'd left the star for the top of the tree until last, planning to sew it down through the two bottom points but then I had a better idea. If I pinned the star to the tree, I could take it off to store the tree, lay it flat on top and pin it down again. That way, it was less likely to get battered when I put it away.


I used one of my T shaped blocking pins for this which is just the right length for the job.

At this point you'd think I would have finished the actual knitting, wouldn't you? But no, another thing I do a lot is think "what else could you use this pattern for?". I managed to talk myself down from knitting some star bunting but I did get distracted by a tree decoration ...


... and a tiny tree with stuffed stars and silver beads for decorations ...


This one's only about 5 cm or 2" tall and I have to admit that it was a bit fiddly to knit.

So, there you have it, a typical Frankie pattern - lots of colours, simple pattern (but taking ages to knit) and several uses for it. One more thing that strikes me is that it's yet another geometric pattern. I think playing with shapes comes a close second to playing with colour.

RainbowAccidental ToyPlay Beads and Honeycomb Bauble

See what I mean? Click on the links below the picture for more details on these four patterns. There are lots of geometrics in my blanket patterns too but I think I've wittered on enough for today. Time to get on with some of those unfinished designs I think.

Wednesday 17 October 2018

More Frankie's Blankies

Try saying that quickly! The adventure that is Frankie's Blankie continues apace. I'm really pleased that so many people have stuck with this KAL this year. The chat and friendship on my ravelry group is definitely going to be one of my highlights of 2018. So many lovely people, from all round the world, encouraging each other with their knitting and sharing stories from their lives.


We're now three quarters of the way through the year which means that the knitters have now finished 36 of their knitted blocks. I continue to be amazed by how different one pattern can look, just with different yarn or colours. I know I've shown pictures from this one before, but look at the difference substituting grey for the stone colour makes.

Laurel, from Wales

Laurel is calling this one 'Textures of Ice  Cream' which is a great name. I've only just realised that this is her first knitted blanket. Considering it includes 48 different stitch patterns, that's pretty impressive. I have to say, I worried that people wouldn't like so many stitches to try - some of which are quite complicated - but I'm glad to say that they've taken it all in their stride. I tend to avoid making my patterns too complicated but there are obviously lots of knitters out there who relish a challenge.

Back to the blankets. Lots of knitters are using this project to get through some of their stash. Barbara is working through her stash of acrylic yarn and, despite all the different colours, I think it works really well as a whole.

Barbara, from the US

You will have noticed a lack of sewing up with this one. Barbara is far from being alone in this. A certain laxness about sewing the squares together is a bit of a feature of this KAL. All I can say is, you'll all be sorry when you've got to do them all at the end.

Here's another beautiful blanket in progress, using stash yarn.

Jackie, from the US

Isn't that lovely? You'll notice that Jackie's used different colours for the singe colour blocks too; this is going to be a wonderful scrap blanket. Also - she's sewn the squares together! 

Melissa is following the colour plan of my original but using shades of Peace Fleece Worsted yarn. I didn't know anything about this company but they look really good. The 'peace' in the name comes from the fact that they use fleece from all round the world to foster mutual understanding and economic interdependence. How about that for a brilliant business model? I see that the worsted yarn comes from Navajo Ramboulliet sheep from the reservation. 

Melissa, from the US

Doesn't this one look fresh and bright? It's going to be a real heirloom when it's finished.

Not everyone is going for the multi-coloured look though. Just look what happens when you stick to one colour ...

Hilary, from Scotland

By the way, Hilary lives in the shadow of Ben Nevis which sounds pretty good to me. For those of you in other parts of the world, Ben Nevis is the tallest mountain in the British Isles. 

Anyway, as you can see, Hilary is using red yarn for all her coloured squares and I think it looks really good. I also feel the need to point out that she only started working on her blanket three months ago and, as well as having caught up, she's SEWN HER SQUARES TOGETHER. Just saying. 

That red yarn is obviously a bit of a favourite, look at this crochet project I found on Hilary's ravelry project page.


As I understand it, this is based on the Wacky Weave Squares pattern by Hilda Steyn, although the centre square is Hilary's own design. This pattern is an example of a technique called Interlocking Crochet which I'd never heard of before but now feel an almost overwhelming desire to try. At once! I may have to get this pattern. 

Concentrate Frankie, we're talking about knitted blankets here. Right, what haven't I shown you? ah yes, this one ...

Monika, from Germany

Isn't this going to be an amazing blanket? Monica is bringing all her different squares together with knitted borders, picking up stitches from the sides of the squares and then casting them off with the three needle cast off. I think that's right anyway. So, no sewing up and a totally unique blanket.

This is just a small selection of some of the many beautiful blankets being worked on from my pattern this year. If you're tempted to join in, or start at the beginning in January 2019 perhaps, the patterns are all available free from my Ravlery Shop. All 48 square patterns will have been published by the end of this year, with the patterns for the knitted border and edging to come in January next year.

And now I'm off to write up a new (and very colourful) pattern, resisting the urge to try that Interlocking Crochet ... or explore the exciting new origami site I've just found, or get on with my first ever linocut, or weave more squares for my pin loom blanket ...

Friday 5 October 2018

Tolkein Treasures

Earlier this week I finally got to the wonderful Tolkein Maker of Middle-Earth exhibition at The Bodleian. You can't take photographs inside the exhibition so all the pictures here are taken from the book Tolkein Treasures by Catherine McIlwaine, the curator of the exhibition and the Tolkein Archivist at the Bodleian - now there's a job title to conjure with.


As someone who has only read The Hobbit and the first book of The Lord of the Rings, I wasn't sure how much I'd appreciate this exhibition but it was really, really good. The captions and interpretive text accompanying the art were well written, detailed and very informative. I learned so much from them and felt that they really captured Tolkien as a man, not just as the author of some of the most popular books in the English language.

First and foremost Tolkein was a creator of languages from his early days. As an undergraduate at Exeter College, Oxford he studied Old and Middle English, Old Norse and Medieval Welsh and went on to teach these subjects throughout a long academic career at Oxford. While still a student, he began working on the two Elvish languages that would become Quenya and Sindarin.

As time went on, he felt that languages without history and myths were dead things and so he began to create the complex fantasy world from which he took the characters and plots that would become his books. The languages, maps and world came first, the books followed later.

You might by now be thinking that Tolkein was something of a solitary man, living in his created middle earth, rather than the real world but the exhibition made clear that this was not the case He was an outgoing, 'clubbable' man with lots of friends and very much involved in his times ... which included the First World War. One of the most moving pictures I saw was that of his matriculation class at Exeter in 1911, with all those who died in the war blacked out. There were very few left, including Tolkein, now standing alone amongst shadows. One college from one University and so many dead.

Tolkein took his finals in 1915 before enlisting and was in France in time for the Battle of the Somme the following year.  Invalided home, he was then able to live with his new wife and baby son. This page from his sketchbook shows how special that time was.


The story of Tolkein and his wife Edith was beautifully told. They met as orphans in what would now be called their teenage years but were forbidden to meet for three years by Tolkein's guardian who didn't want his school career interrupted. They waited and were married in 1916. Theirs was a happy marriage, lasting more than fifty years.

Edith at 17

Edith was the inspiration for the Elven princess, Luthien Tinuviel, whose love story with the mortal Beren lies at the heart of The Silmarillion and, when she died in 1971, Tolkein had Luthien's name engraved on her headstone. He deisgned heraldic emblems for both Beren and Luthien, this is one of  the two for Luthien.


The couple had four children and Tolkein seems to have been very much a family man. The children weren't banished from his Oxford study as many would have been; indeed, they used to gather there in the evenings for stories. One of those stories was later to become The Hobbit

For many years Tolkein wrote and illustrated letters to his children from Father Christmas in the North Pole, telling of his latest adventures. This is from the first one in 1920.


You can now buy a book of these letters, Letter From Father Christmas, which would make a lovely Christmas present. 

On holiday in Filey in 1925, one of the children lost his toy dog, Rover. To console him, Tolkein told him the story of Roverandom and his adventures, all about a real dog transformed into a toy. This is one of Tolkein's shorter works now available as a lovely, small hardback, complete with his illustrations.


The first tale to be published from Tolkein's world was of course The Hobbit which sold out in a few months when it was published in 1937. His friend and fellow Oxford academic C S Lewis said in his review "Prediction is dangerous: but The Hobbit may well prove a classic". How right he was.

The tale of Bilbo Baggins, the not very brave Hobbit and his quest for treasure in the company of a band of dwarves has become the favourite book of countless children and adults. 
Some of Tolkein's colour illustrations for the second edition of 'The Hobbit'

I first heard of this book when my older brother came home from primary school, full of this wonderful book that his teacher was reading to the class. Our Mum searched it out and we both went on to read and re-read it. Here's my paperback from the 1960s (my brother's is older and tattier, he must have re-read his many times).


I particularly loved the map at the start of the book, complete with runes. Why is it that so many of the best children's books have maps as endpapers?


Anyway, after the success of this book, Tolkein's publishers were hoping for more Hobbit stories. Instead of which he gave them the story of the Lord of the Rings, told in thee long volumes and not really aimed at children. They published it, no doubt with their fingers firmly crossed, and it went on to be one of the best selling works of fiction ever.


This is the first, one volume edition that I remember my brother reading and reading and ... If you're reading this Stephen, get to the exhibition!

I haven't really talked about the maps of middle earth, of which there were many wonderful examples at the exhibition. Here's the first map of The Shire from 1938 with the Brandywine River running through the middle.


There were so many different types if art to see. This drawing, called 'The Tree of Amalion' has many different leaves and flowers growing together; I think it would make a beautiful embroidery.


I'll leave you with Tolkein's illustration of one of my favourite parts of 'The Hobbit', when Bilbo (protected by the invisibility the ring gives him) talks to Smaug the dragon. The exhibition continues until the 28th of this month; do go and see it. Tickets are free but must be booked in advance to stop it getting too crowded.