As ever, my days are full of house sorting, trying to work and being ill. Needless to say, the first two things contribute to the third one. Never mind. I read a good line the other day - 'Happiness is not given to you, you have to pick it up here and there during the day'. Isn't that good? So, I find that when you can't go out or do very much without feeling rotten, the trick is to do a little bit of lots of things and to vary them as much as possible. Even if they're not fun things (scraping glue off the landing after taking the old carpet up for example) it still gives you that feeling of having accomplished something and means you enjoy the cup of tea you promised yourself as a reward all the more. It doesn't always work but I persevere.
Anyway, one of the things I've been working on over the last month or so is repairing my daughter's old baby blanket. I've been meaning to do this for a long time but she's moving all her stuff out from here later this year and I really didn't feel I could pack up a moth-eaten blanket for her to put with her treasures!
I had the idea of knitting a picture blanket back in 1991 when I was expecting my second baby and designed all sorts of picture squares on knitting graph paper.
All that picture knitting entailed lots of darned in ends so I then knitted another set of squares for the back of the blanket and embroidered letters and numbers on them. Here's baby Rose with her new blanket.
And here she is practising sitting up later on (note my hand positioned ready to catch her when she gets excited and topples backwards). I've never known a baby with such a fine head of hair. It had to be held back with clips before her first birthday.
One more old photo - "look, I can sit up all my own now".
Fast forward more than thirty years and, after being put away for years, the blanket was a sorry sight. There was a lot of this ...
I'd used all sorts of different yarn and the ones that had wool in had obviously provided a tasty treat for the moths. So, I matched the colours as best I could (using acrylic yarn this time) and re-knitted each of the damaged squares.
 |
| The snowman, old and new. |
I used a combination of intarsia and Fair Isle for the picture squares and then embroidered on the details afterwards, mostly using black yarn. The letter and number squares were simpler to replace as I just had to knit a coloured square and then add the letter or number with backstitch. Unfortunately, the square that I'd used as a label also had a hole in; that one took a bit longer to embroider.
I added writing to another blank square to record when the blanket was repaired. There are still some empty squares should it need doing again in the future.
In order to replace the damaged squares, I had to take out both the damaged one and the one behind it as I'd sewn them together in pairs before assembling the blanket. It was at this point that I discovered the damage to some of the knitted sashing. This was probably the time when the project looked most daunting.
It would have been good if I'd heard of blocking your knitting back then; needless to say, the squares varied quite a bit in size. I did block the new ones after finishing them but they weren't always a great match with the one they had to be sewn together with.
There was a break here while I worked out what to do with the sashing. I could see that I'd used a chunky black yarn for this and, believe it or not, I'd knitted it in strips and then woven them over and under each other where they met. Then, for good measure, I'd sewn them together where they overlapped.
Luckily black Stylecraft Special Chunky was a good match for the original yarn. I had to unpick the knitted strips until I had sound yarn at each end and then knit a new section directly on to the existing stitches and graft them on to the other end. All very fiddly and lots of ends to sew in.
Once that was done I sewed the pairs of squares back in, gave the whole thing a wash in the bath - I didn't dare risk it in the machine - and draped it over the line in the sun to air it.
At this point I thought I was nearly done; just the blocking to do. I was hoping that blocking the blanket would smooth out some of the lumps and bumps which it did but ...
... see that hole, next to the house square? The tension of blocking revealed damage I hadn't spotted on yet another square. I couldn't face taking all those pins out and having to start again another time so I lay on the floor to unpick that pair of squares. Meanwhile, the blanket had dried so I sprayed it well and left it to dry as it was.
I re-knitted the offending square (an umbrella), sewed it back in and then took out all the pins. The next problem was that the garter stitch border looked a bit weak and wobbly (it wasn't the only one - I was sorely tempted to throw the whole thing away at this point). Instead, I found a big crochet hook and worked double crochet all round the edge using the chunky yarn. This made a huge difference, strengthening the edge and making the whole thing look much better. Finally, it was done.
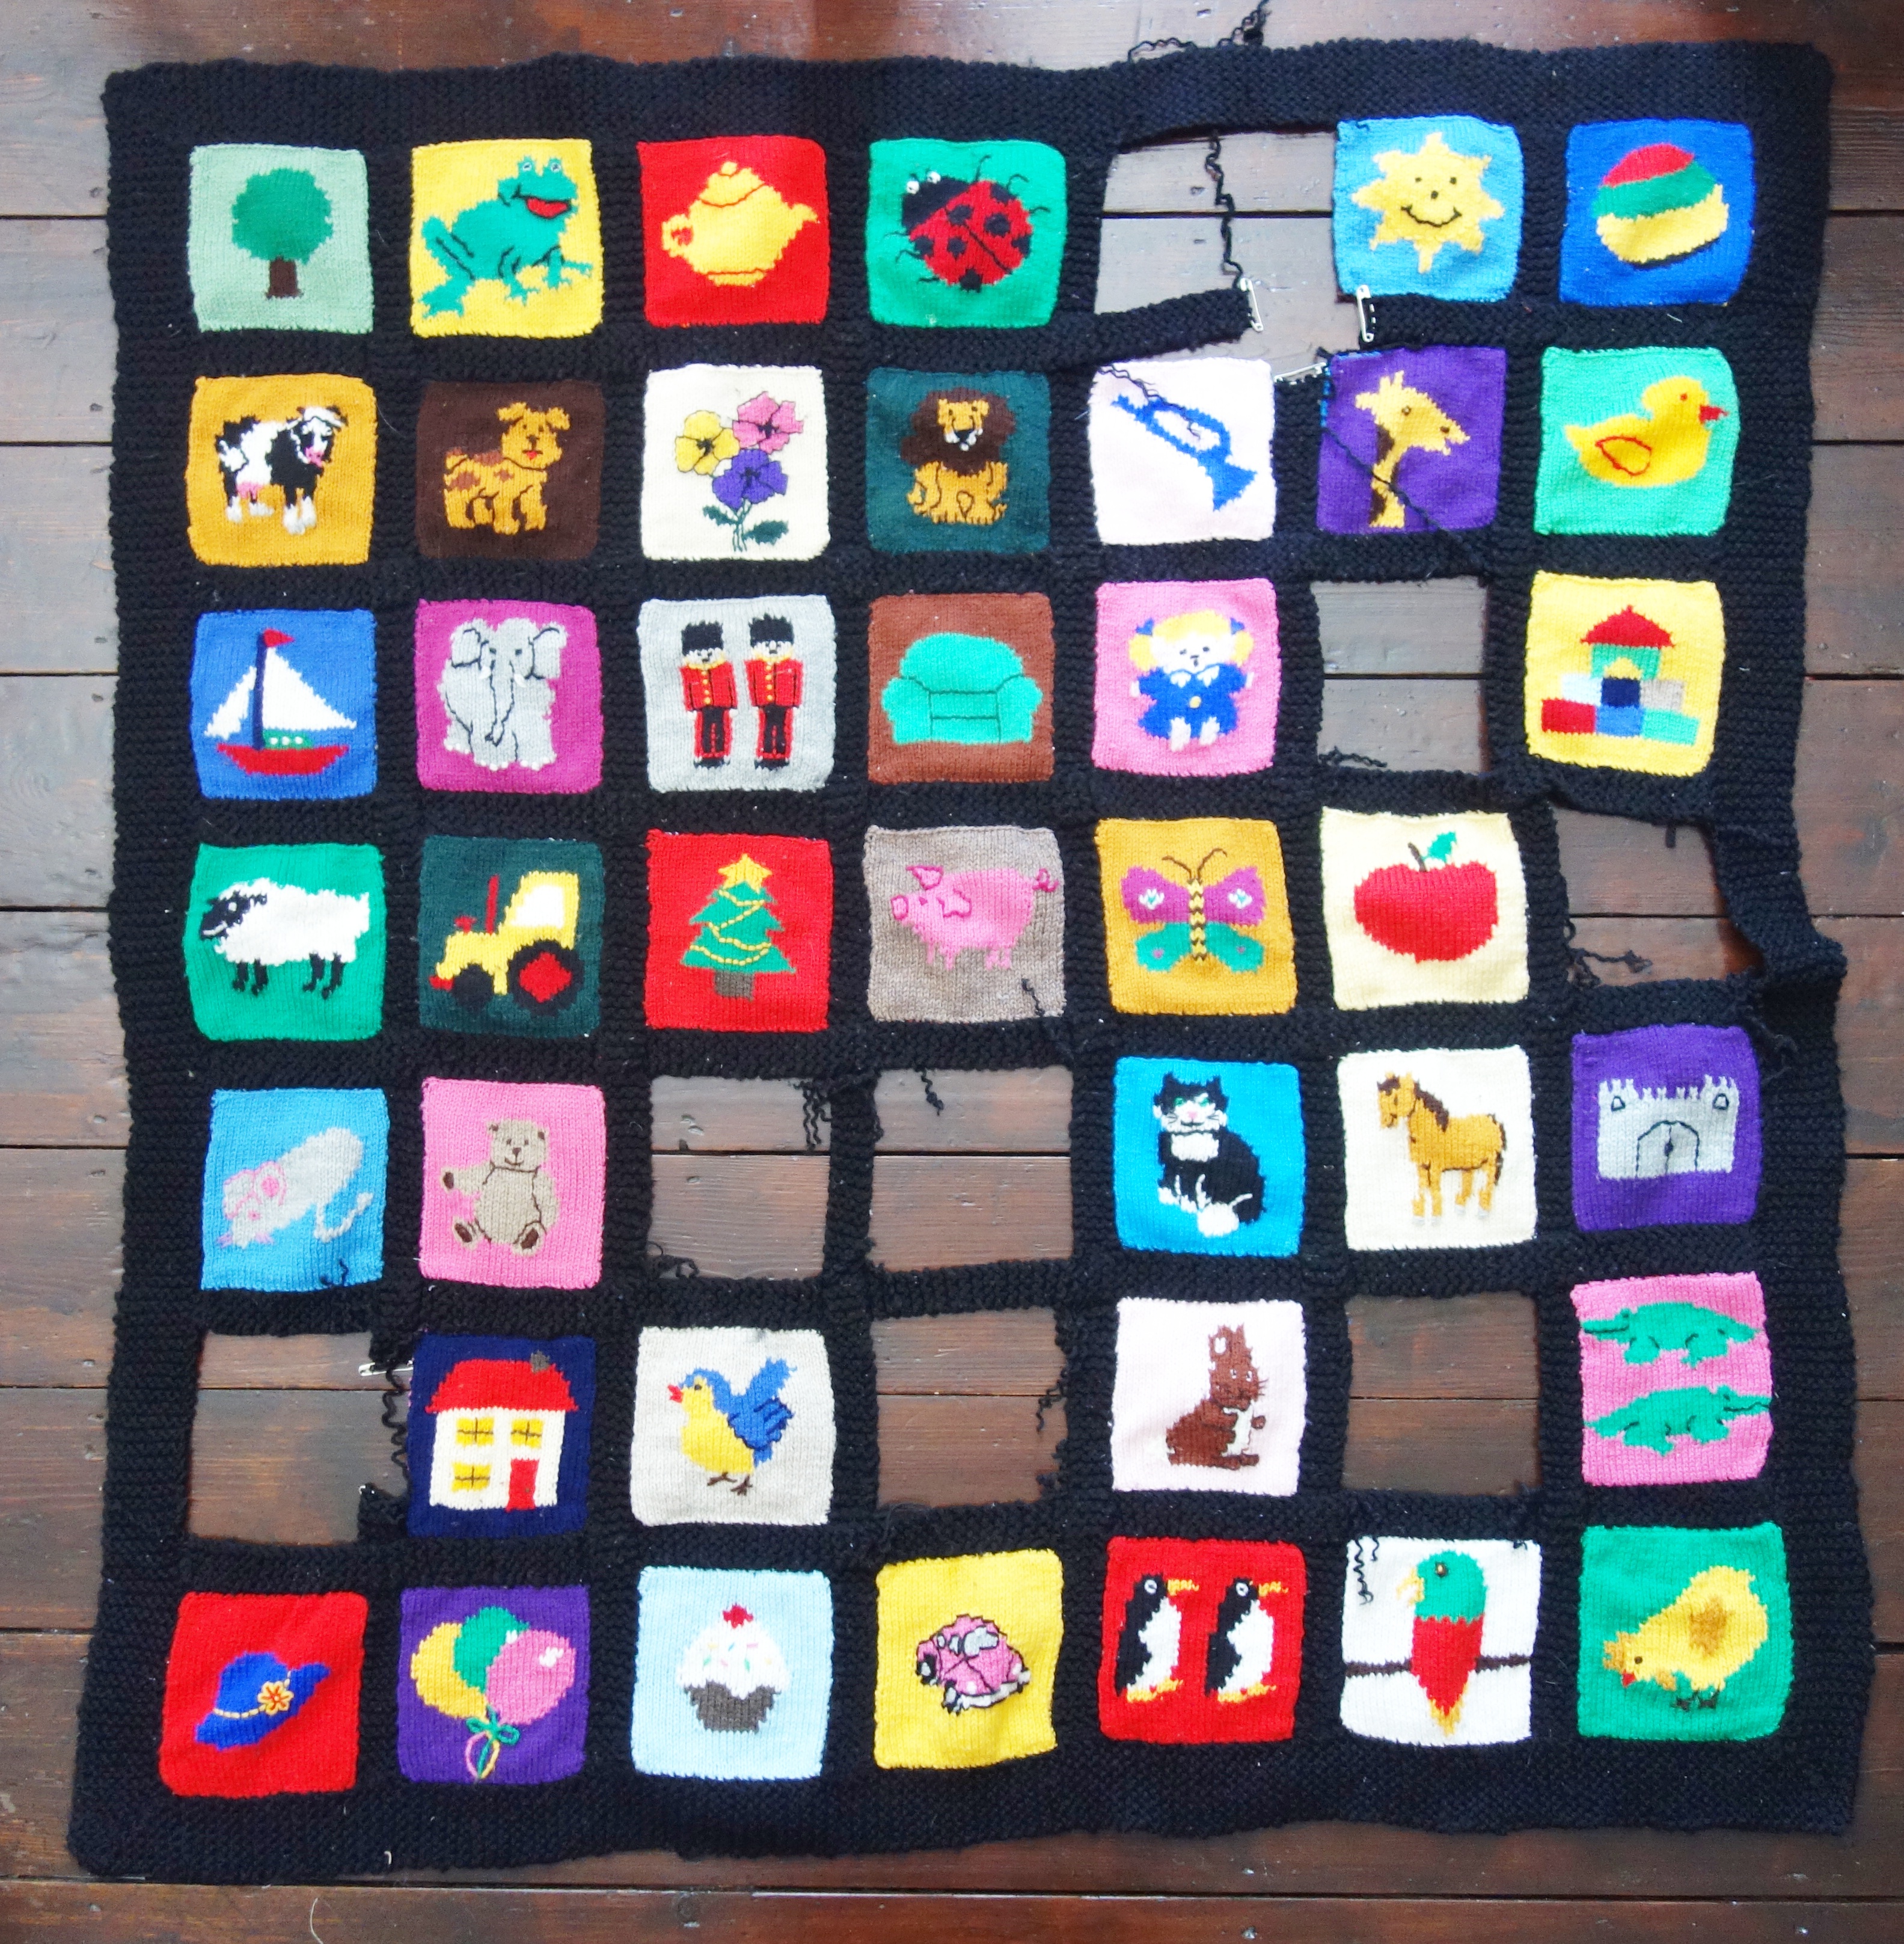
Would you like to see the pictures in more detail? There are 49 of them all together, seven rows of seven.
I think I got a lot of ideas from illustrations in children's books but that yellow teapot is an old favourite of mine. It's been broken and repaired several times and is now only used as an ornament.
The sun was one of our baby toys (I've still got it); it combined a squeaker and a mirror on the back with nice points to chew on. That giraffe reminds me of the first time Rose saw a giraffe in real life at
Whipsnade Zoo. She was so excited and, from the look of amazement on her face, you could tell that she had thought were giraffes were just something in books not real animals. Looking at them, you can see why she would think that; they do look like something out of a story.
There are a lot of animals on this blanket, aren't there? Pigs were a particular favourite of both my children. Rose even had a pig birthday cake one year.
Phones don't look like that any more but the building bricks are a classic I think. Jack had those for his first birthday and both children played with them a lot.
The television is another thing that looks dated now. By the time Rose was born we didn't have a television. Before that we had a portable black and white set - remember those? I think that train might have been inspired by the toy train in one of the pictures of Rose on her blanket earlier on in this post. And there's that umbrella, the square that caused all that trouble during blocking.
On to the bottom row now. That car was ridiculously complicated - what was I thinking of? - but the blanket finishes with a nice little row of birds.
Now that it's done I've written up notes on how I repaired it and put them together with the charts and the chunky yarn for the sashing in the bag with the blanket. Maybe they'll help next time it needs repairs. Although I hope that won't be for a while!
After making the baby blanket, you'd think I'd have had enough of picture knitting for a while wouldn't you? But no, in 1993, I was back, this time with colour charts.
These were the designs for a patchwork jumper for Rose's big brother Jack. He chose the things to go on it so it's a record of his favourite things. There are 44 little pictures on the front, the back and both sleeves. The pictures on the front shoulders are a Jumping Jack for him and a Rose for his little sister. He wore the jumper for years until he grew out of it and yes, I've still got it. It has survived the years better than the blanket did, probably because it got washed more.
Now that the Great Blanket Repair Project is finished I've been turning my attention to work. The first draft of my latest pattern is done. I just need to update a couple of old patterns that are referred to in it and it'll be ready to publish. It will be pattern number 600. How on earth did I write so many patterns?