Saturday, 18 November 2023

1950s Embroidery

I recently shared this embroidered picture worked by my Mum on my ravelry group and I thought it would be nice to have a look at some other embroidery from the 1950s.


I think this dates from the 1950s when Mum was a young woman, although I haven't been able to track down the original pattern yet. I particularly like the little cat and the dog and the fact that it's two women. Somehow, it makes me think of the house we lived in when I was very small which had a steep hill behind it.

Charity Down Farm

One of the needlework magazines of the time which often featured beautiful embroidered pictures was 'Needlewoman and Needlecraft' which was published for many years.


There would be a free transfer for some simple motifs but, for the bigger items, you had to order the transfers. The earliest issue I have is number 2 from April 1941 (it was a quarterly magazine).


This copy (found in an antique shop) still has the original list of people in the road to whom it was lent. Miss Beech had it first and then it was to passed on to eleven other friends and neighbours, changing hands every two or three days until finally returning to Miss Beech who kept it.


I remember my Granny doing this with her neighbours. When money was tight, this was a good way of getting to read different magazines. As well as needlework, the magazine also had knitting and crochet patterns, as well as tatting sometimes. In this early issue, I'm rather taken by the embroidered knitting on this little jumper.


The pages of the magazines were mostly black and whit but there is another colour spread in the middle of this one.


Although it's applique, that house picture is in a similar style to the one Mum embroidered. I do have one piece of early applique that she did but, again, I don't know where the pattern came from.


This alpine scene, worked in wools, needs a bit of a repair as moths have got to some of the colours.


I gave this one to my daughter, along with a copy of the original pattern and the necessary colours of tapestry yarn so that she can either fill in the gaps or work a new one. This was the cover project on 'Needlewoman and Needlecraft' in July 1955.


This next magazine, from April 1954,  has another beautiful picture on the cover.


I love this collection of embroidered flowers, one of the transfers that could be ordered through the magazine; this one would have cost you 7d (that's just over half a shilling in old money or about 3p in new).


The magazine also carried adverts for companies which would supply pre-printed fabric or kits for the designs too. Flowers were a very popular subject for embroidery. I have several pieces worked by my Mum, including this pretty little cloth.

All of these embroideries could do with a wash and press ...

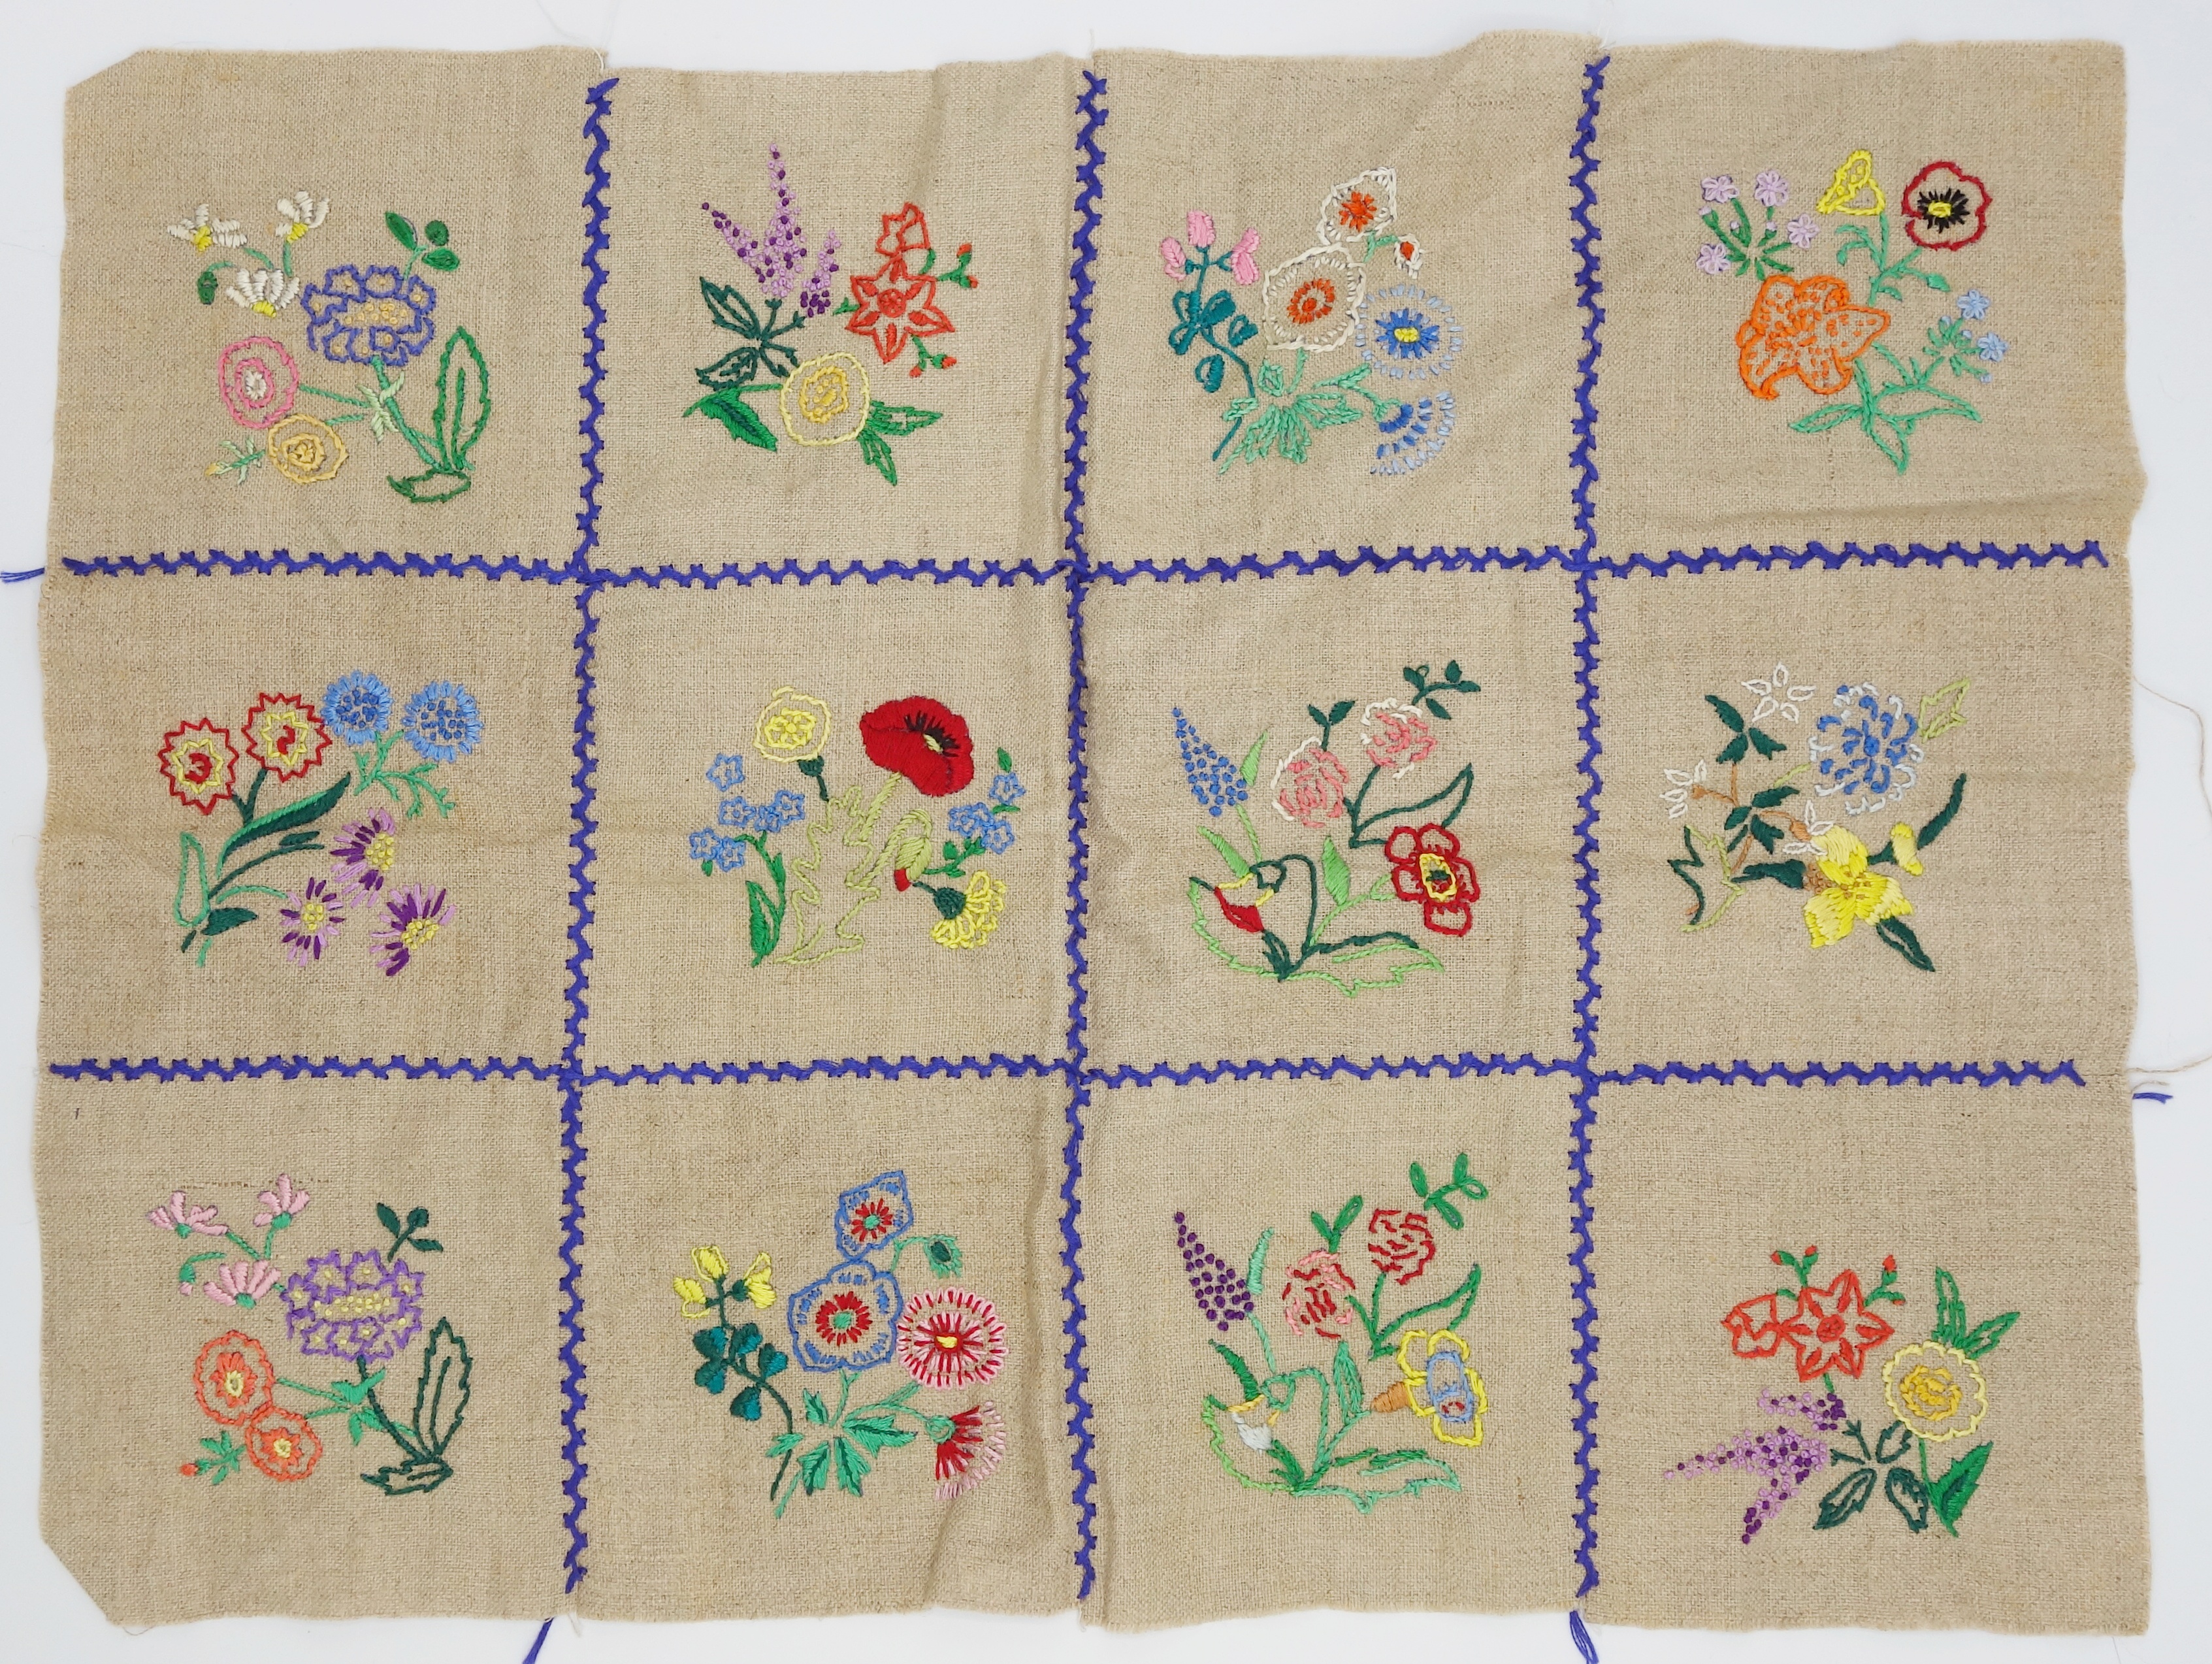
This one is especially nice and I wish I could find the original pattern. I wonder what it was intended for?


I would like to use this one in some way but haven't worked out how yet. It's made up of little squares, embroidered together. I wonder if Mum bought the marked squares as a set?


The style of these strikes me as a sort of modern Jacobean embroidery as do these flowers from the same magazine.


There are more nice patterns in this particular magazine. I like the stitch pattern on this jumper - pictured on yet another impossibly thin model. Mind you, the wartime rationing was still in force well into the 1950s.


And who remembers these belts? When they came back into fashion in the 1970s I wore the one that Mum had worn twenty years earlier. Sadly, it wasn't a crocheted one though.


This is the most exciting set of patterns for me though. Tiny embroideries to be made into brooches. You could order the brooch frames as well as the transfers through the magazine.


I have a small collection of these, several of which were embroidered by Mum. Hers are the three on the left.

I should like to collect more of these; aren't they pretty?

I have one more finished embroidery of Mum's and it's a big Willow pattern one, measuring about 45 cm / 18" across.


I know that this one was from a copy of 'Woman's Own' magazine but I don't know the date. I think it would look good framed under glass or plastic as a small table top.

I hope you've enjoyed this browse through 1950s embroidery. I'd love to hear of any old family embroideries that you have or can remember.

Monday, 13 November 2023

A New Quilt and a New Bedroom

First of all, the new quilt doesn't go in the new bedroom. Actually, the new bedroom doesn't even have a bed but more of that later.

As regular readers will know, my son moved into his new house earlier this year and I decided to make him a quilt to mark the occasion. He asked for one to go on the coffee table which he inherited from his Grandma which sounded like a good idea. Now this is quite a substantial coffee table - about 4' x 6' - and I normally only make small quilts but I didn't let that put me off. 

The planning was easy. I decided to make a rail fence quilt using lots of different colours and, in February, I sewed the first trial block.


Simple to cut and easy to sew. I worked out that I needed 84 blocks all together so I set about cutting and piecing them, one colour group at a time. By March I had all the blocks done and pieced together - so far, so good.


There was a bit of a delay while I hunted through my large stock of fabric for something big enough for the wide border ... and then I had to hunt again for some fabric for a narrow, inner border.


I was a bit apprehensive about pinning such a big quilt but had a breakthrough when I thought of Mum hanging her big quilts from the bannisters to pin them. I didn't fancy doing that but it did give me the idea of putting my big square table in the middle of the room and letting the quilt hang from the sides of that. This worked a treat and gravity helped smooth out the creases.


I worked out a simple quilting pattern made up of lines, curves and circles and set to work. You may or may not be able to make it out in this picture ...


I think it's a bit clearer on the back. You can see how the lines come together to create circles (sort of).


I really like watching the quilting appear; it's like the back stitch on a cross stitch picture, it turns a flat design into something with depth and texture. There is one slight drawback though - hand quilting takes a long time. And when you're making a big quilt, it takes a very long time.

So  ... I quilted through the Spring and then had a few weeks break to make this quilt for a friend's birthday. This is only a mini quilt, the sort of thing I normally make. The pictures are some of her old family photos.


Then it was back to quilting the big quilt. I quilted through the Summer and on into Autumn. By September I'd moved on to quilting that big border and I finished it on the 1st October.


Then there was just the little matter of binding the quilt. Little? I'd decided to piece a scrappy binding which was just as well because I ended up needing six metres of it. I machine sew my bindings on to quilts and then hand stitch them down on the wrong side, something I normally see as a quick task at the end but this one took days (of course it did). Finally though, eight months after cutting the first strip of fabric, it was finished.


I'm really pleased with it (and so is my son). I haven't got a photo of it on his table yet but here are a few  more taken here.


You can see the scrappy binding in this one ...


... and, of course, a quilt isn't finished until it's been labelled (something I could very rarely get my Mum to do with her quilts).


That's the quilt accounted for. Now for the new bedroom. After the huge undertaking that was my new room of requirement (craft room) last year, this year's big house project is a new bedroom for me. With a lot of help, I am turning what was my daughter's old bedroom into mine. It's on the top floor of the house, next to my craft room so I'm gradually moving upwards. I wanted to sleep at the back of the house which is quieter and also has a lovely view across all the gardens which make up a big green space.

The room has been used to store all sorts of stuff for ages, here are a few 'before' pictures.


Piles of books, old photos and more than a few empty bookcases waiting to find somewhere to live. There's also a pile of my daughter's stuff waiting for her to move somewhere where she has room for it. 


More books, boxes and a spare bed. Do you see the dolls house with the red roof? My Mum and Dad gave me that for my seventh birthday, I re-furnished it and gave it to my daughter when she was four and now she's given it back to me (now that I've reached the age of nostalgia). I'm hoping to find room for it in my new bedroom and to bring it back to life. I've still got a few of the original furnishings back from when it was new.

As you can imagine, it took us quite a while to empty the room (and yes, all the other rooms are a bit fuller now). Mind you, another huge pile of bags for the charity shops went out of the house, at some point the house must surely look a bit emptier?

The first thing to do was the painting. I wanted to keep the original colours (yellow walls and dark pink woodwork) but it was all it a bit tatty and grubby so I gave it another couple of coats of paint. This was hard going, even though I only did one coat on one wall per day but I got it done in the end.

When I'd finished the walls, my daughter came for the weekend and painted the ceiling for me and, between us, we trimmed some of the old shelves I put up years ago so that they fitted a bit better.


The other thing we got done that weekend was to finish the new curtains for the room. I was fine at doing the sewing - again, a couple of seams a day - but my Long Covid brain can't cope with calculations so I didn't trust  myself when it came to all that measuring and cutting. My son helped me measure and cut the fabric so that the pattern matched and then my daughter helped me with the hemming. 


It's times like this when an old house shows its true colours. Big windows and uneven floors mean that you can't just hem both curtains to the same length; one has to be a bit longer than the other so that they're level with the floor. I chose a lovely, old-fashioned rose fabric for my new curtains. After the modern look of the room of requirement, this one is going to be pure 1960s Hampshire (told you I was nostalgic).


Over this last week I've been re-varnishing the floor (and my hands) so that looks nice and new too. The next thing to do is to order my new bed (the old one is staying in the old bedroom as a spare bed). Unfortunately, choosing the bed involves numbers again so I'm having help with this too. I've decided to get a small double which is 4' rather than 4'6" wide to take up less space but can't decide on which length to get. I've found a company who make custom sizes (including mattresses to fit) so I'm thinking of a slightly shorter bed too but don't know yet whether I'm going to get a 6' or a 5'9" - decisions, decisions.

I'm hoping to have the bed, my chest of drawers and my clothes rail (I don't think I've ever owned a wardrobe) in place by Christmas so that I can move up there. Then I can see what room I've got left up there for other pretty things ...

Thursday, 21 September 2023

If in doubt - label it

I think having an archivist daughter is starting to rub off on me. Having (sort of) finished my new room of requirement / craft room, it bothered me that it still wasn't quite right. Apart from obvious things like the lack of curtains (I want to make patchwork ones which means it's all very complicated), I was still having trouble finding things.  

So, I spent several weeks working round the room, checking what was where, re-sorting if necessary and then adding lots and lots of labels. I started with the fabric store, just adding little printed labels to the bottom of each shelf so that I knew what was in each of the baskets.


This immediately made me feel much happier. Even though I don't need to know what's in the baskets until I go to the them, just the fact that I can see the labels when I glance that way makes my brain feel much more comfortable. I was really surprised by how much difference those little labels made.

Most of this fabric was inherited from my Mum who was a wonderful quilter. Hence this sign ...


We were saying how the fabric shelves could be used like a free shop for either of the grandchildren to take stuff from as needed so my daughter made me this sign. Isn't it nice?

I'm nothing like the quilter Mum was but I have been stretching myself this year by making the biggest quilt I've ever attempted. I normally only make small quilts but I wanted to make one for my son's coffee table in his new house. He inherited the table from his Grandma and it's a big one so the quilt needed to be big too. I'm pleased with how well I'm getting on with it; I had to use a hoop for the quilting which I hardly ever do but I'm nearing the end now. I'm quilting the border and then I just have to bind and label it.


Anyway, back to the labelling. My big Knitting Kallax was already labelled so that just needed a quick tidy and clean in passing.


In the corner next to it is my knitting bookcase which houses all my patterns - 17 files of them and that's not counting the Christmas specials - as well as some old knitting books and patterns (in the suitcases).


That shelf full of files holds the 17 main files while the rest are either on the shelf above or on top of the bookcase. The collection of notebooks on the second shelf from the top is my hotchpotch of pattern notebooks where I scribble down notes as I work on designs. They are numbered in order but are really quite a mess. One day I'll add dates and things to the pages.

Next to this bookcase is my little fireplace which still has my Rainbow Gnomes on the mantelpiece. I've added a lovely wooden magnetic puzzle from Myriad Toys that my son gave me years ago as I think it goes well with the gnomes.


The wall opposite the big Kallax shelves is the window wall where I have two of my three tables. One is an old Regency card table which I can open up to make a big square table; this was very useful when I needed to pin Jack's quilt earlier this year. The other table is our old kitchen table with the top painted white.


You can just about make out the Ten Stitch Rectangle on the card table, one of several samples I'm knitting for a pattern. Next to it is my very, very useful (and now tidy) craft trolley. I can really recommend this; it's sturdy, comes on wheels and you can get various attachments for it. The only extra I've added so far is that lid.

I know, it looks like I've got curtains but these are just the old net curtains from my son's house tied to the curtain rail for the summer so that I could keep the worst of the heat out on hot days.  I use the big white table all the time; those granny squares are some of my samples from my How to Knit a Granny Square pattern. I came across them yesterday and thought I might have another play with them.

On the other side of the white table is another set of cube storage. The tall 1 x 4 unit is from IKEA but the 2 x 3 unit next to it is from Habitat. Their 'Squares Plus' range is a perfect match for the IKEA Kallax (the 'plus' is important as they do a slightly smaller range too) - useful when you want a combination that IKEA don't do.


You can't see the bottom row of cubes in this photo as they're hidden by the table but they're all full of WIPs. There are knitting and crochet projects as well as weaving and various needlecrafts - some I definitely will finish and some I'm not sure about. Before I labelled and sorted this unit, it was a real mess. Everything I didn't know where to put ended up stacked in those two empty cubes or piled on top. This photo was taken a couple of weeks ago and it's still tidy. Today there are just some flowers and a mini weaving loom on the top and an empty little basket underneath.

The next two sets of shelves are the ones that took the longest to sort and label. These are two of the deep Billy bookcases from IKEA which house a huge mixture of craft supplies and books.


The bottom shelves on both are taken up with quilting books and supplies (with my badge making machines tucked in behind them). The next shelf up on the left is for cross stitch while there's more quilting on the right hand bookcase, as well as my 3D beading stuff.  The third shelf up on the left is for weaving while hardanger, blackwork and needlepoint are on the right.

It gets increasingly bitty as you go further up the shelves. From left to right on the third shelf from the top are loom knitting, my Sizzix machine and dies and weaving books. Then come the tatting supplies and embroidery. The next shelf up on the left has all my miniature making things; you can see the little house that I wrote about here a couple of years ago. Since then I have made some furniture for it but there's still more to do.

On the right hand shelf are my button making supplies - I love making buttons - and then all the bits and bobs for toy making. The top shelves have felt, fimo, resin and lino printing things (have you noticed that I can't resist a new craft?) and then anything else that wouldn't fit is on top of the bookcases.

For those of you still awake, you'll be glad to know we've nearly finished going round the room. The last bit of sorting and labelling was my desk drawers.


I used to have what I loosely call papercraft supplies all over the place and they took up a surprising amount of space. Not any more. All sorted, labelled and put away.


These are just a couple of the drawers. The boxes are smaller versions of the big IKEA  Kuggis boxes that I've used in other parts of the room. These are brilliant. They come with lids that double up as trays which is a real bonus and the different sizes can be stacked together too.


Not all the desk drawers are full of little boxes. There are drawers of card and paper and one with my sketchbooks, pens and paints in too. It's amazing how much can be fitted into ten not especially big drawers.

I have to say that having my craft things organised like this has made a huge difference to how I work but it's also meant that I'm doing different crafts again. I keep being tempted to make another button, work on my latest little beaded Christmas house or tat another gift tag. It's also really good to be able to tidy up properly. My Long Covid brain can't cope with muddle so being able to put things away is very important. As my Granny would have said "a place for everything and everything in its place".

So yes, I am still able to make things as well as label my supplies. In recent months I've crocheted another Lazy Vee blanket for a new baby (baby Esther, born last month) ...


... and knitted a re-worked version of my old Raggy Doll pattern for another, slightly older baby.


This is one of the many patterns that I want to update with current yarns and much better instructions and pictures. I shall have to knit another doll to do that.

Having crocheted the Lazy Vee blanket I was inspired to turn the same basic idea into a triangular shawl so that's waiting to be written up now. Like the blanket, it uses two colours in single row stripes but with no need to cut the yarn. 


The variegated yarn is King Cole Bramble DK, a yarn that I absolutely love working with. I used it in a different shade for Esther's blanket too.

A little while ago I sewed a couple of Japanese knot bags, just to see how they worked. I had great trouble with the instructions that I found so worked out  my own way in the end. You thread the long handle through the short one and then the little bag can hang from your wrist.


I saw some lovely versions online with flat bases but these would have made the sewing even trickier. Of course, this isn't true with knitting ...


This will be my next published pattern. Two sizes of knot bags, knitted in fabric / linen stitch so they don't need lining and with flat bottoms, stiffened with plastic or buckram. They're knitted in the round until you get to the handles which have to be worked back and forth. Just so as you know, taking a photo of a bag on your own wrist is very very difficult.


I hope you've enjoyed this little tour of my room and are inspired to add labels to everything you own! Next time I'll show you some 'before' pictures of the next room that we're working on. Oh yes, there's another one ...